Friday, November 15, 2013

Jello Shots (Party Season)


 With the Holidays coming up (Thanksgiving in Canada is long over but for you American folks it is quickly approaching) then CHRISTMAS the catalyst for all alcohol induced family parties and fraternizing.  I thought that I would share a post I wrote a little while ago but never got around to sharing, you can substitute the strawberries I used for any festive fruit (orange peels?) but strawberries are always an option.

(non-drinkers skip down to the instructions for what we are about to make and change recipes accordingly.)

There are so many ways to get liquor from a bottle inside your body (personal preference: as fast as possible) but the best method, for bachelorette parties, weird keggers and most events in general is the beloved jello shot. The jello shot has one fundamental flaw however, those little plastic cups! how many times has a person cut their mouth on one of those as they cave in from your booze induced superman-like suction, or when everyone else manages to get the jello free into their mouth and you are left with digging your finger around in there and shoving it in your face; your hands are now sticky, everyone else is looking at you, it is the worst, you just want to party! let your minds become enlightened because here is a no-muss no-fuss way to make jello shots, with no garbage / leftovers!
(Non-Drinkers substitute anything below that says booze with water of the same measurement)
 
Supplies
- Spirit of choice (vodka) (1 cups)
- flavoured jello
- water (as directed)
- fruit of your choice:
- strawberries
- ice cube tray / some sort of plate
- chocolate (if you want to get fancy)


Step 1:
Make some jello, after it is off the heat instead of adding one cup
of cold water, add one cup spirit
 
Step 2:
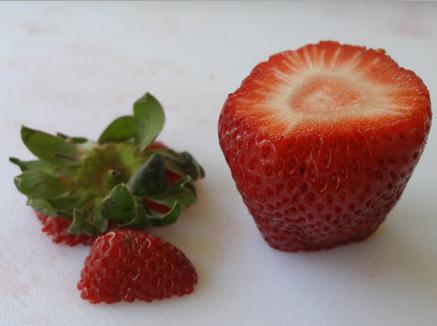
cut the very tip off the bottom of the strawberry so it can stand on its own, take off the leaves and with a small spoon or melon baller core out the strawberry, be careful not to go through the bottom or sides (try and get as much out as possible for maximum shot

 
Step 3:
Pour the vodka/jello mixture into the strawberries and set on a plate,
then refrigerate (at this stage if you chose to get fancy dip the strawberries
in melted chocolate before you put the liquid inside)
 
Step 4:
Party (Garnish with lime or sugar if you want)
 
 
oh hello
 

Friday, October 4, 2013

PUMPKIN FUDGE


Hello Everyone
((I am still deluding myself into thinking that there are more than zero people reading the blog))


I have been gone forever, well since February but I have been super busy! doing nothing and everything all at the same time (lost my job, moved house, got a job, got another job etc) but I figured that the fall season is the best time for crafts and recipes because it isn't too hot outside and there is not much to do when it gets colder and just well IT IS CONVENIENT OKAY!?


Now that I've explained myself I thought I would start off October with some Pumpkin Fudge because everyone loves Pumpkin flavored everything right? I have never made any sort of fudge before and have only had it the odd time I've been at some random trip to a Mennonite market or some town with a population of  > 1000 so I didn't really know what to expect but holy guacamole it was actually the best thing ever.

What you will need:
2 c. sugar
1 c. brown sugar, packed               
¾ c. butter (no substitutions)
⅔ c. evaporated milk
½ c. pumpkin puree
1 ½ tsp pumpkin pie spice
1 (12oz) pkg white chocolate chips (try butterscotch too maybe, mix it up)
1 (7oz) jar Marshmallow Crème
 1 ½ tsp. vanilla extract

 
Step 1:
Butter your pan, if you don’t have a 9x13 pan just use anything that can be put in the fridge that will give you some decent sized (but not too decent these are real sweet) pieces. Feel free to also use aluminum foil instead of butter to easily pop the fudge out when it’s cooled.
Step 2:
Combine the first 6 ingredients in a heavy saucepan and cook over medium heat until the sugars dissolve, then continue the process until mixture begins to boil (STIR!) Here is where having a candy thermometer would be helpful, but I have not purchased one yet so boil for about 30 minutes (if you have a thermometer then it should reach 234 ~ 243 degrees, and you’re fancy)
Step 3:
Remove the mixture from heat and stir in the white chocolate chips until they are all melted and the mixture is smooth, add in vanilla extract and marshmallow and mix well (can add whatever else you want at this point chopped pecans maybe!?)
Step 4:
Pour into prepared pan of your choice and cool to room temperature then cut that bad boy up and refrigerate / nomnomnom


Seriously guys, this fudge was amazing
I had to quickly give it out to everyone I know because it was all so tempting! If you have never made fudge before you should definitely give it a try it was not as intimidating as I thought it was going to be, pinky swear. I'm thinking of trying out different flavours, maybe peppermint with crushed candy canes for Christmas!? Endless possibilities.
 
Let me know if you give it a try!


Friday, February 1, 2013

Friday, January 25, 2013

Valentines Day - Heart Pins

Hello!
Thought I would share a quick and easy valentines day project with you, you can give them to coworkers or your kids to take to school in a little goody bag. I am selling them over at my shop which opens up February 1st, you can check it out at www.etsy.com/shop/pumpernickeldarling check out the instructions below and let me know how it goes if you end up giving it a try!! 

Supplies:
Wool Felt in relevant colours 
Embroidery Thread
Stuffing
Small Safety Pins
Scissors
Cardstock
Needle
Marker / Chalk


Step 1: Cutting 
Cut two 2 1/2 inch squares (you can do any square size really)
Stack the two squares on top of one another and cut out a heart shape on one of them (i made a template on cardstock to make it easier) Cut out the two hearts and line them up wrong side together


Step 2:  Sewing
Cut a 18 Inch piece of thread in any colour that corresponds with the heart colour that youre making, i started the first stitch in between the two pieces in order to hide the knot. Stictch 3/4 of the way around making sure to leave a small gap.


Step 3: Stuffing
Use a pencil, pen or chopstick etc to stuff a small bit of stuffing at a time into the opening that you left from the previous step.  Once the stuffing is in and the heart is nice a full sew up the gap 


Step 4: Attaching the Pin
Place a small safety pin in the centre back of the heart, make sure you place it so you are able to open the pin easily once it is sewn (i messed up the first time and had to take the stitches out, not a huge pain but a pain non the less)


Tie a small knot at the end of your embroidery thread and begin sewing the pin onto the heart through the back ring of the safety pin (shown above) This will help anchor the safety pin 


Make as many as you want! they don't take much time at all (promise) take some pictures and leave a comment letting me know if you gave it a shot or have any other quick and easy felt diy's you think i would like!


Monday, January 7, 2013

news! news!


**Exciting News**
my best friend has a new online boutique you guys can check it out if you want
www.shopwanderlust.ca. anyway she texted me today and asked me to make her a bunch of rose bud earrings similar to ones i made for christmas gifts!! to sell!! super stoked, i will put up a tutorial of them after they go up for sale in February!

Saturday, January 5, 2013

Envelope Back Pillow Covers

Helloo!

Recently i have been trying to understand and grasp the concept of sewing and working on, you know straight lines. There is a cute little fabric shop downtown called Needlework and they do a whole assortment of classes for different things every month, it is super awesome and super informative. I decided to hit up the pillow making sesh with my mom and thought i would share what i learned!

The Pillows i made for this tutorial were for my best friends birthday and i ended up giving them to her before i took a picture of the final product so, the picture of them completed is from the class (not the best quality photos i had to use my phone because my camera died mid process, ill get the hang of it soon, promise.)

-One Pillow 16"-
Supplies:
Fabric: 1 fat quarter for the front and one for the back, i chose two different fabrics for all of mine but if you want to make it all the same that works too. (fat quarter = 18x22)
Spool of thread: Coordinating with your fabric choices
Empty Bobbin
Sewing Machine
Fabric Scissors
Pins
Chalk/Pencil/Pen/Whatever


Pattern: I used the pattern that we got at the class, but they are super easy to make, if you're following these instructions and making 16" pillow you will want a pattern for the front of 17" square, for the back you will want two pieces that are 11x17 (super easy i promise, just grab a ruler and some scrap paper)


Step 1:
take the two back pieces that will create the envelope opening (in this case it was the white fabric for me) Fold the fabric over 1/4 inch along the 17" side (wrong side of the fabric) and then press, fold another 1/4" and press again. then pin and stitch in place (do the same for the other piece)


Step 2: 
Lay the front piece (purple) right side up, place the two back pieces you just finished on top of the front piece so that the right sides of those are face down. Position them so the two hemmed lines (17") are in the centre and the unfinished edges of the two pieces and the front piece are matching, this will give you an overlap of the two hemmed edges ( since i still havent mastered the straight line i positioned them so the "nicer" hem was the one exposed, position them however you want" Pin in place and sew leaving a 1/2 inch seam allowance.


Step 3:
Flip your pillow inside out and push out the corners (recommend chopsticks to get a nice point)


[these are the covers i made in class, thought it might be a good idea to include a finished product in here, arent they lovely!]

Let me know if you attempt making some or if you have any other recommendations for a first time sewer like myself that i could try out!

p.s standard helper picture, super useful to have around: